 PCB
PCB FPC
FPC Rigid-Flex
 FR-4
FR-4 HDI PCB
 Rogers High-Frequency Board
 PTFE Teflon High-Frequency Board
 Aluminum
 Copper Core
 PCB Assembly
 LED light PCBA
 Memory PCBA
 Power Supply PCBA
 New Energey PCBA
 Communication PCBA
 Industrial Control PCBA
 Medical Equipment PCBA
 Testing Service
 PCBA Testing Service
 Certification Application
 RoHS Certification Application
 REACH Certification Application
 CE Certification Application
 FCC Certification Application
 CQC Certification Application
 UL Certification Application
 Transformers, Inductors
 High Frequency Transformers
 Low Frequency Transformers
 High Power Transformers
 Conversion Transformers
 Sealed Transformers
 Ring Transformers
 Inductors
 Wires,Cables Customized
 Network Cables
 Power Cords
 Antenna Cables
 Coaxial Cables
 Net Position Indicator
 Solar AIS net position indicator
 Capacitors
 Connectors
 Diodes
 Embedded Processors & Controllers
 Digital Signal Processors (DSP/DSC)
 Microcontrollers (MCU/MPU/SOC)
 Programmable Logic Device(CPLD/FPGA)
 Communication Modules/IoT
 Resistors
 Through Hole Resistors
 Resistor Networks, Arrays
 Potentiometers,Variable Resistors
 Aluminum Case,Porcelain Tube Resistance
 Current Sense Resistors,Shunt Resistors
 Switches
 Transistors
 Power Modules
 Isolated Power Modules
 AC-DC Power Modules
 DC-AC Module(Inverter)
 RF and Wireless
Quality Inspection Standards for Hand-Soldered Joints: Key Criteria for Reliability
2025-11-14
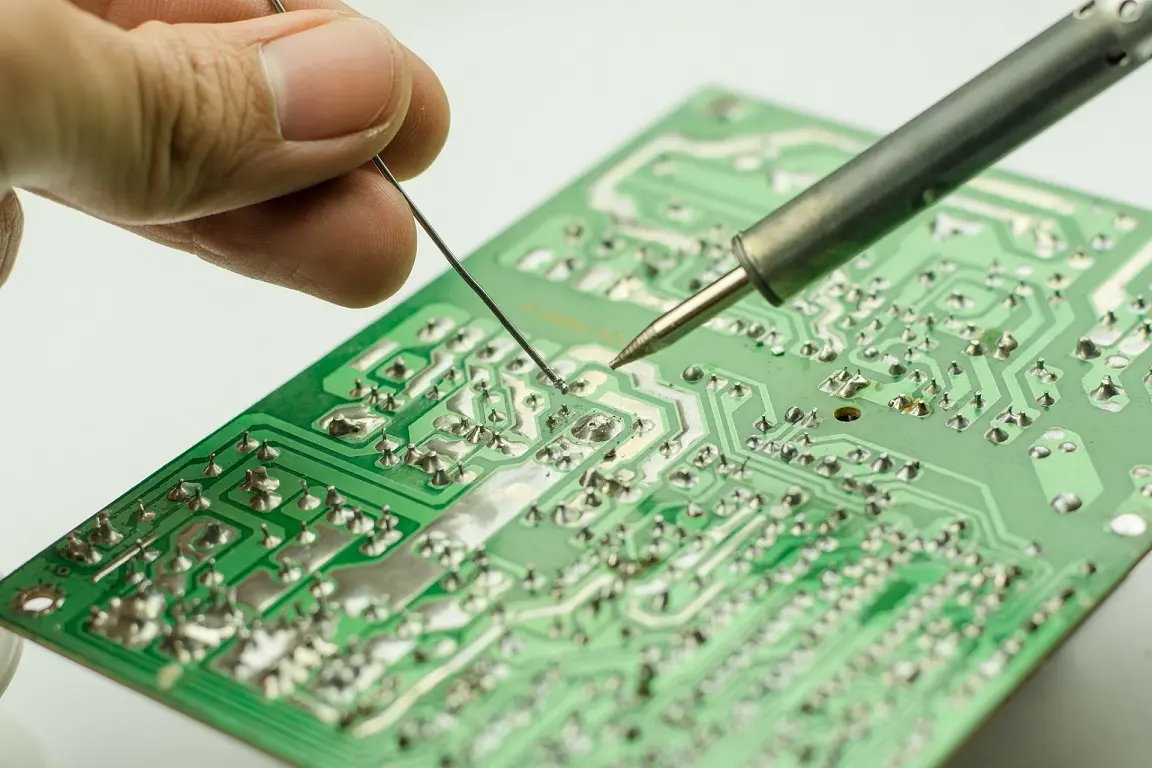
Hand soldering remains a critICal process in electronics manufacturing, repair, and prototyping, where precise manual control determines the integrity of solder joints. Unlike automated soldering, hand soldering relies heavily on operator skill, making consistent quality inspection essential to avoid failures like poor conductivity, mechanical weakness, or long-term reliability issues. This article details the core quality standards for hand-soldered joints—focusing on wetting, freedom from defects like cold solder joints, and other critical criteria—aligned with industry standards (IPC-A-610, IPC-J-STD-001) and practical inspection practices.
1. Core Standard 1: Proper Wetting (Fundamental to Solder Joint Integrity)
Wetting refers to the ability of molten solder to spread uniformly across the component lead and PCB pad, forming a secure metallurgical bond. It is the most critical indicator of a reliable joint:
- Visual characteristics: The solder fillet (the curved inteRFace between solder and the lead/pad) should be smooth, shiny, and contiguous. It should flow naturally to cover 100% of the pad area and wrap around 270° of the component lead (for axial or radial components) or fully cover the pad for surface-mount devices (SMDs).
- Contact angle: The angle between the solder fillet and the pad/lead should be 30–60°. Angles >70° indicate poor wetting (insufficient solder spread), while angles <30° may suggest excessive solder or flux contamination.
- Common defects indicating poor wetting: Dull, grainy, or "frosted" solder surfaces; solder beads that sit on top of the pad (instead of spreading); or gaps between the solder and lead/pad interface. These issues often stem from oxidized surfaces, insufficient flux, or improper soldering temperature.
2. Core Standard 2: No Cold Solder Joints (Avoiding Mechanical and Electrical Failure)
Cold solder joints (also called "dry joints") are the most common hand-soldering defect, caused by insufficient heat during soldering. They appear visually distinct and compromise both conductivity and mechanical strength:
- Visual identification: Cold joints have a dull, matte finish with a rough or crumbly texture. The solder fillet may be irregular, with visible cracks or gaps between the solder and component/PCB. Unlike good joints, they do not adhere tightly to the surfaces.
- Tactile and functional checks: Gently probing the joint with tweezers reveals movement or looseness (good joints are rigid). Electrically, cold joints cause intermittent connectivity, voltage drops, or increased resistance—often leading to device malfunctions under vibration or thermal cycling.
- IPC-A-610 requirement: Cold solder joints are classified as "defective" (Class 2 and 3 applications) and require rework, as they cannot withstand the operational stresses of most electronic devices.
3. Core Standard 3: No Solder Bridges or Excessive Solder
Excess solder or bridging between adjacent joints poses short-circuit risks and impairs reliability:
- Solder bridge definition: A unintended connection of solder between two or more pads, leads, or traces. For fine-pitch components (pitch ≤0.5mm), even a thin layer of solder between pads constitutes a bridge.
- Acceptable solder volume: The solder fillet should be convex but not bulbous. For through-hole components, solder should fill the plated through-hole (PTH) 75–100% of its depth without overflowing onto the opposite PCB side (unless specified). For SMDs, solder should not cover the component body or block key markings.
- Inspection focus: Use a magnifying glass (10–20x) to check for bridges between closely spaced pads (e.g., QFP, BGA joints). For high-density PCBs, X-ray inspection may be necessary to detect hidden bridges under components.
4. Core Standard 4: No Voiding or Flux Residue
Voids and excessive flux residue undermine long-term joint reliability and electrical performance:
- Voiding limits: Voids are gas pockets trapped in the solder during reflow. Per IPC-A-610, voids should occupy ≤10% of the solder joint volume. Voids >15% reduce mechanical strength and thermal conductivity, making joints prone to cracking under thermal cycling.
- Flux residue guidelines: Residual flux (a necessary soldering aid) should be minimal, non-corrosive, and uniformly distributed. Corrosive flux residues (uncleaned or low-quality flux) cause long-term oxidation and joint degradation. For critical applications (e.g., aerospace, medical devices), flux residue must be fully cleaned with compatible solvents.
- Visual cues: Voids appear as dark spots or gaps in the solder fillet (visible via X-ray or cross-sectional inspection). Excessive flux residue manifests as sticky, discolored deposits around the joint.
5. Core Standard 5: Mechanical Strength and Structural Integrity
A reliable solder joint must withstand mechanical stress, thermal expansion, and vibration:
- Fillet shape and adhesion: The fillet should have a smooth, concave-convex profile that distributes stress evenly. It should not peel away from the lead or pad when gently flexed (using tweezers with moderate force).
- Component alignment: The component should remain properly positioned (no tilting, lifting, or shifting) after soldering. For through-hole components, leads should be trimmed to 1–2mm above the solder joint to avoid mechanical strain.
- Thermal cycling resilience: While not checked during visual inspection, joints meeting the above standards typically withstand 1000+ thermal cycles (-40°C to 125°C) without cracking—per IPC-6012 requirements for Class 2 and 3 devices.
6. Inspection Methods and Tools
To ensure compliance with these standards, use the following inspection practices:
- Visual inspection: Use a 10–40x magnifying glass or stereo microscope to check wetting, fillet shape, defects, and residue. Good lighting (preferably white LED) enhances visibility of solder texture and gaps.
- Tactile inspection: Gently manipulate components with tweezers to check for loose joints (no movement should occur). Avoid excessive force that could damage the joint or component.
- Electrical testing: Use a multimeter to measure continuity and resistance across joints. Abnormal resistance (higher than adjacent joints) may indicate cold solder or poor wetting.
- X-ray or cross-sectional inspection: For critical applications or hidden joints (e.g., BGA, microvias), use X-ray imaging to detect voids, bridges, or incomplete wetting. Cross-sectional analysis (slicing and polishing the joint) provides detailed insight into metallurgical bonding.
Hand-soldered joint quality is defined by five core standards: proper wetting (smooth, 30–60° fillet), no cold solder joints (dull, loose connections), no bridging/excess solder, minimal voiding (<10% volume) and flux residue, and robust mechanical strength. Adhering to these criteria—aligned with IPC standards—ensures joints are electrically conductive, mechanically resilient, and reliable over the device’s lifespan. For hand soldering, consistent inspection (using visual, tactile, and electrical tools) is as critical as operator skill, as it catches defects early and prevents costly failures.